Manually Changing the beaTunes Memory Configuration on Windows
Starting with beaTunes 4, you should be prompted by beaTunes to increase the heap size, should it be necessary.
If you want to grant beaTunes 4 more memory without the explicit need, you have to set the environment variable BEATUNES_MEMORY to a higher value.
E.g. to set the max memory to 1GB, set the environment variable BEATUNES_MEMORY to
-Xmx1G
Note the absence of a B—the unit B for Bytes is implicit. Please be careful! Any typos for this value will cause beaTunes to not start anymore.
You can verify the current memory settings in the About dialog.
To set an environment variable in Windows 7,
- Go to the
Startorb, right-click onComputerand selectPropertiesin the context menu. - In the left pane, click on
Advanced System Settings. Then click on theAdvancedtab. - At the bottom right is a button for
Environmental Variables. Click it. - Then edit/add the variable
BEATUNES_MEMORYfrom the top/user section.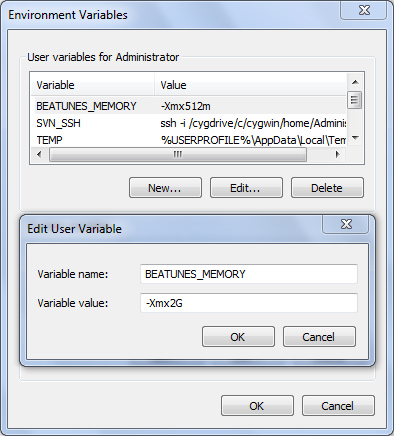
To achieve the same for Windows 8/8.1/10, open the File-Explorer, then right-click on Computer and continue as described above for Windows 7.
beaTunes 3
The following recipe applies to beaTunes3, not beaTunes4 or later.
If you repeatedly run into OutOfMemoryErrors, and other remedies don't help, you might want to manually change beaTunes' memory configuration.
To do so, you have to edit two files with a simple text editor like Notepad.
But before you do anything else, make sure you have shut down beaTunes.
Both files are located in the beaTunes3 installation directory, typically in c:\Program Files\beaTunes3
One is named beaTunes3.l4j.ini, the other is named beaTunes3.l4j.ini.template.
- Open
beaTunes3.l4j.iniwith Notepad (e.g. through right-click, Open With). - Find the line starting with
-Xmx - This parameter specifies the maximum heap size of the Java beaTunes3 process. By changing this parameter you can grant more or less memory to beaTunes. Typically this parameter is less than 1000m, meaning less than 1000 megabytes.
- Change the
-Xmxparameter to a higher value, e.g. to-Xmx900m - Save the file
To make the change permanent, you need to also edit the second file, i.e. beaTunes3.l4j.ini.template:
- Open
beaTunes3.l4j.ini.templatewith Notepad. - Find the line containing
-Xmx${vm.memory.heap.max} - Replace the whole expression with the same parameter you used in
beaTunes3.l4j.ini, e.g.-Xmx900m. - Save the file
One thing to keep in mind when changing the -Xmx parameter is, that you cannot assign more memory to beaTunes than your system has to offer. E.g. granting beaTunes a value of 4000m does not make any sense on a system with only 2GB of RAM.
Also, keep in mind that beaTunes3 is a 32bit process. This implies that there is a maximal heap size allowed in your system somewhere around 1200 megabytes. If you specify a too high value, beaTunes will not start up again until you lower that value.
After you saved both files, start using beaTunes with the changed settings.
If Windows does not let you save the file, you might have to edit it as Administrator. To do so, go to Start -> All Programs -> Accessories. Right-click Notepad, and then click Run as administrator. If you are prompted for an administrator password or for a confirmation, type the password, or click Allow or Yes. Then proceed to edit the files mentioned above.
Starting with 3.5.14, beaTunes' About dialog shows your currently configured minimum and maximum heap sizes under Memory.
To increase the max heap beyond what's possible for a 32 bit process, please check out this 64 bit version.
For macOS/OS X, please see here